First game of the year is to be a skirmish with as much random generation as possible.
Terrain
Using just one of my four 2'x4' cabinets as a gaming table, the surface was divided into 6 with a 25% chance of higher ground in each sector. This resulted in two areas of high ground at diametrically opposite corners of the table, so I grabbed the first two corner hill shapes that came to hand for insertion under the gaming cloth.
Terrain type in different geographic zones was also generated using a D10:
- 1-2 = wood
- 3-5 = fields
- 6-10 = plain
Road entry & exit points were determined, first by board edge (1-2 and 9-10 for the short sides; 3-5 and 6-8 for longer sides) and exact entry & exit points were worked out by dividing the edges into 10 parts and rolling D10. A few pre-made road sections were selected to fit the bill, some buildings placed in a likely spot and a fordable stream wound between the low-lying terrain features.
Using the Army Generator tables in the back of VainGlorious, I rolled enough units for a skirmish:
Allies:
- Carrier platoon
- 1x troop P16 halftrack AC
- 1x troop FTs (+37mm)
- 1x troop 2 pdr AT guns (+ Loyd Carriers)
- + HQ added (GCO group, Guy Lizard, 2x Despatch riders, 1x cavalry messenger)
Germany:
- 1x troop Pz 35(t)
- 1x troop Pz IIIE
- 1x platoon Schützen
- 1x platoon foot infantry
- + HQ added (GCO group, SdKfz 250, SdKfz 221, Befehlswagen I)
- +1x troop Pz IIB
Allied positions
Not yet knowing the axes of advance for any of the German forces, the Allies were disposed to try and cover all eventualities with Carrier sections and the slow moving FTs with some 2 pdr support covering the Northern approaches and the remaining 2 pdrs, P16s & a Carrier section sweeping the fields to the East.
The P16s & Carriers formed a mobile screen but were to fall back towards the 2 pdr positions if pressed.
Due to their poor top speed, the FTs were to form an armoured pivot in 'Blacksmith's Copse' guarding the road, bridge and open land thereabouts (forests available from TerrainShed, of course 😊).
German jumping-off points
For the solo player to remain impartial, the axes of advance for each unit were diced for with a bias toward a main thrust through the open fields with the possibility of feints or flank attacks:
- 1: wide outflanking sweep via large wood (Schützen only rolled this)
- 2-4: central feint over bridge (infantry & Pz IIs)
- 5-10: main thrust over fields (Pz 35(t)s & Pz IIIs)
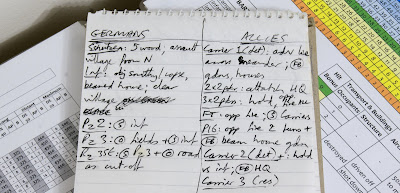
Orders for the combatants were sketched out thus and the P16 halftracks put in a staggered line to aid falling back by stages:
Turn 1
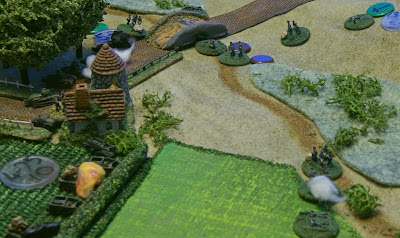
Right from the get-go, a P16 brews a skylining Pz III up. It's not the troop CO, so it only gets a black smoke marker and unit morale drops by 25% (fireballs all over the tabletop can get a bit annoying, so I just use those when command tanks are put out of action).
A flurry of enemy movement reports pass among the Allies and orders for a 2 pdr to support the right flank. I use white tiddlywinks as an on-table aide-memoire that an order has been sent, which is flipped over to reveal a tick when receipt is successfully diced for.
Turn 2
Charging down the slope, the Pz IIIs luck doesn't improve when another falls victim to the French armoured halftracks, this time it is the command tank (players do not need to know if the CO has decided to lead from the front or hang back; when a casualty occurs, it is randomly diced for. In this way, command tanks can neither be targeted by unscrupulous players or hidden at the rear of a column by 'gamesmen'). One other is also suppressed ('stunned' for AFVs).
Needless to say, the Pz IIIs fail the morale check and lose a level. (I am toying with making the 'crucifix' morale level markers a little more scenic but they do the job).
Over on their right flank, the Pz IIs have also halted their advance having lost two tanks to the FTs.
Turn 3
 |
| The German CO gazes down from the folly tower |
The 2 pdr in the village square manages to disable the last Hanomag before it disappears into the wood, its occupants continuing on foot. 50mm mortars rounds begin to fall among the FTs.
Boys armed carriers are sent out to the Allied right and those with Brens brought into the centre. When the Pz 35(t)s emerge from out of a dip, they begin taking hits, albeit ricochets.
Turn 4
The Pz IIs lose their command tank so the German infantry is forced to cross the stream unsupported.
The CO steps up to help rally the light tanks.
After the Panzers finally get some decent hits on the P16 halftracks, the latter destroy the last Pz III and the most exposed of the Czech built tanks is destroyed by the 2 pdrs back at the fallback line.
Turn 5
Bren carriers scramble to fill gaps in the line.
The infantry assault goes in across the meadow, taking casualties and suppressing fire on the right side from the FTs co-axial MGs.
Turn 6
Looks like the Bren carriers might have got in position in the nick of time.
With forward elements on the right gone-to-ground in the stream bed, some infantry pass under the bridge to the far side of the road, while the German CO is still trying to rally the light tanks.
On the other side of the battlefield, the Pz 35(t)s press on, unaware of the anti-tank rifles crouched in a hedge.
Turn 7
One Boys misses, another ricochets but the third brings the troop command tank to a grinding halt.
The Bren carriers by the smithy get into action just before the oncoming Germans get within grenade range, forcing them back to the stream. The rest of the platoon are similarly pinned down, some (like it's CO and the 50mm mortar), are in the open. A critical miss by the P16 halftracks earns them a morale level penalty wildcard (not that they were thinking of advancing, however).
Turn 8
...while in the very next move, a 'critical hit' by the FT tanks generates some wildcard bonus reinforcements.
 |
| Reinforcements! |
The German infantry detachment works its way back to the main body in the relative shelter of the stream bed.
Turn 9
The 2 pdr AT troop is ordered to move up to forward positions in the fields.
Having received their orders by despatch rider, the reinforcements begin to move into the village.
The hapless Pz IIs are down to the last tank but the infantry before them is infiltrating to the right of the bridge to attack the copse.
Unwilling to advance, the Czech-designed tanks are crept up on by the AT rifle teams.
Turn 10
...And the Schützen platoon finally arrive at the forward tree line to the North.
...at the exact moment the infantry assault goes in on Blacksmith's Copse.
Switching tactics, the Pz 35(t)s use the stream bed to transfer right to help the infantry attack. (Realising they had edged out of contact too far forward, the Boys teams fell back towards their NCO, missing their chance on more Panzer kills).
Turn 11
The 2 pdrs move up to secure the flank from further Panzer attacks...
...and the regrouped AT teams saddle up to pursue the sly fox.
A single Panzerbusche shot from the Schützen regrouping in the forest reduces the 1st section Bren carriers to 2/3 strength, which they can ill afford with the odds they are facing...
...while the regular infantry -moving like silent and deadly ghosts- get the drop on two carriers of 2 section which they meet head on in the undergrowth...
Carrier section 1 lays down arcs of fire and falls back by stages into the village.
...but the Pz 35(t)s, still pursued by the AT carriers, are caught in the open by the now deployed 2 pdrs.
Carrier section 1 is barely able to stay out of Stielhandgranate range...
...both carriers eventually succumb but one Bren debuses safely and takes cover in the village fountain.
Hand-to-hand fighting ensues but with a fresh platoon, the French repel the Schützen...
...near the smithy, although the FTs and carrier section 2 are practically wiped out, the German infantry there fall back too.
Turn 12
...which flushes out the FTs, enabling the Panzers to have 'surprise butt sex' with the command tank.
Carrier section 1 lays down arcs of fire and falls back by stages into the village.
Turn 13
Urged on by the High Command, the light tanks charge in to support their infantry...
...but the Pz 35(t)s, still pursued by the AT carriers, are caught in the open by the now deployed 2 pdrs.
Turn 14
The platoon CO, the remnants of his carrier section 2 and the FTs go on alert, ready for the inevitable infantry assault.
...both carriers eventually succumb but one Bren debuses safely and takes cover in the village fountain.
Turn 15+
Hand-to-hand fighting ensues but with a fresh platoon, the French repel the Schützen...
...near the smithy, although the FTs and carrier section 2 are practically wiped out, the German infantry there fall back too.
Epilogue
OK, so perhaps I should have re-rolled the wildcard instead of feeding a fresh platoon into the Allies but hey, c'est la guerre!
I quite liked the idea of the pronged attack (which was generated randomly if you recall for solo playing reasons), rather than a concentrated schwerpunkt, with the possibility of the Schützen working around the flank (although by happenstance they were rumbled in the distance).
This game will be replayed with the same terrain & forces (including Allied infantry reinforcements to arrive between turns 5 & 12). Allies will be in the identical initial positions for an all-round defence but this the Germans will be allowed a concentrated attack.


No comments:
Post a Comment
Feedback welcome!