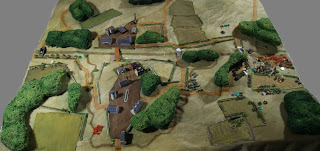
I needed a tabletop layout as a basis for my introductory video on the 6mm France 1940 YouTube channel and had recently seen one with a canal centrally featured.
The hill shapes gave me high ground to the North and something of a flood plain to the South.
There were a number of crossing points over the canal as well as the silted-up part to the East, with a natural stream (traversable with care by most units) around the South of the town. The bridges were set for demolition by the Allies but I decided later that only a random number of them will detonate correctly as the German forces approach. All woods were 'open'.
(Sharp-eyed readers might notice the Panhard 178s in their old positions before I decided the marshy area was fordable.)
(Sharp-eyed readers might notice the Panhard 178s in their old positions before I decided the marshy area was fordable.)
As the 222s neared Pont à l'Ouest, only the two Easternmost bridges directly in front of the German advance crumbled in the ensuing explosions. I decided the German CO was going to be a bit contrary and have the schwerpunkt over towards the marsh.
The concealed 18 pdr (top right in the wood by the Pont du Marais) gets a Pz 38t long shot kill. This was unfortunately not to be repeated very often as the Panzers rolled down the open ground.
German cavalry filter through the trees like some kind of modern day mechanized timberwolves, on the hunt for prey. The 18 pdr by the pillbox plugs away at the advancing Panzers.
Various standing orders were in place in the event of certain bridges remaining intact. However, this resulted in a great deal of confusion with radio problems when new orders were issued. The briefly incommunicado Renaults began acting on their standing orders (for a couple of turns before comms was restored) and infantry with fresh instructions, were intermingling in opposite directions and seemingly with conflicting or false orders.
Medium mortars zero in on the plucky field gun crew
Armoured cars lay down suppressing fire on the South bank to the West.
Panzers pour through the gap and the dismounted cavalry sneak into the marsh. French infantry fan out into the fields, their Hotchkiss tanks "hurtling full pelt" around the back of Horseshoe Wood.
The 2 pdr, H39s and second French platoon move towards fallback positions.
The Panhards are overrun but not before their 25mm cannons take out some Panzers first. The H39s fall back losing one tank for two and the R35s with a commanding view from near the wood pick their flank shots.
At the other side of the battlefield, suppressing fire from the 222s and platoon MG34s enables the riflemen to cross the canal but with some losses from the pillbox Vickers.
The Carrier Platoon drops back to it's 2nd position. The German HQ arrives in the area (after taking a wrong turn) to boost morale.
The German advance in the East slows in the deadly crossfire. Round after round of 2 pdr & 37mm AP slams into the Panzers.
Overlooked from two places of high ground on both sides and their morale shaken, the Germans cannot make any headway across the stubble field.
 |
| The view across town |
 |
| Stubble field of destruction |
 |
| Final Positions |
In the West, the Carrier Platoon and a 47mm AT gun pretty much hem in the German advance on that flank; on the other side of the battlefield, insufficient room to manoeuvre has trapped the Panzers into a crossfire zone, the Allies falling back all too effectively into dominating positions.
 |
| Unit movements |
There was a lot of terrain on the board as I had only laid it out for visual effect initially. Then the restrictive nature of the canal crossing made the game even more claustrophobic for the Germans who would have benefited greatly from having even only one artillery battery of any calibre available.


No comments:
Post a Comment
Feedback welcome!