Wednesday, 16 March 2016

Some More Linear Objects

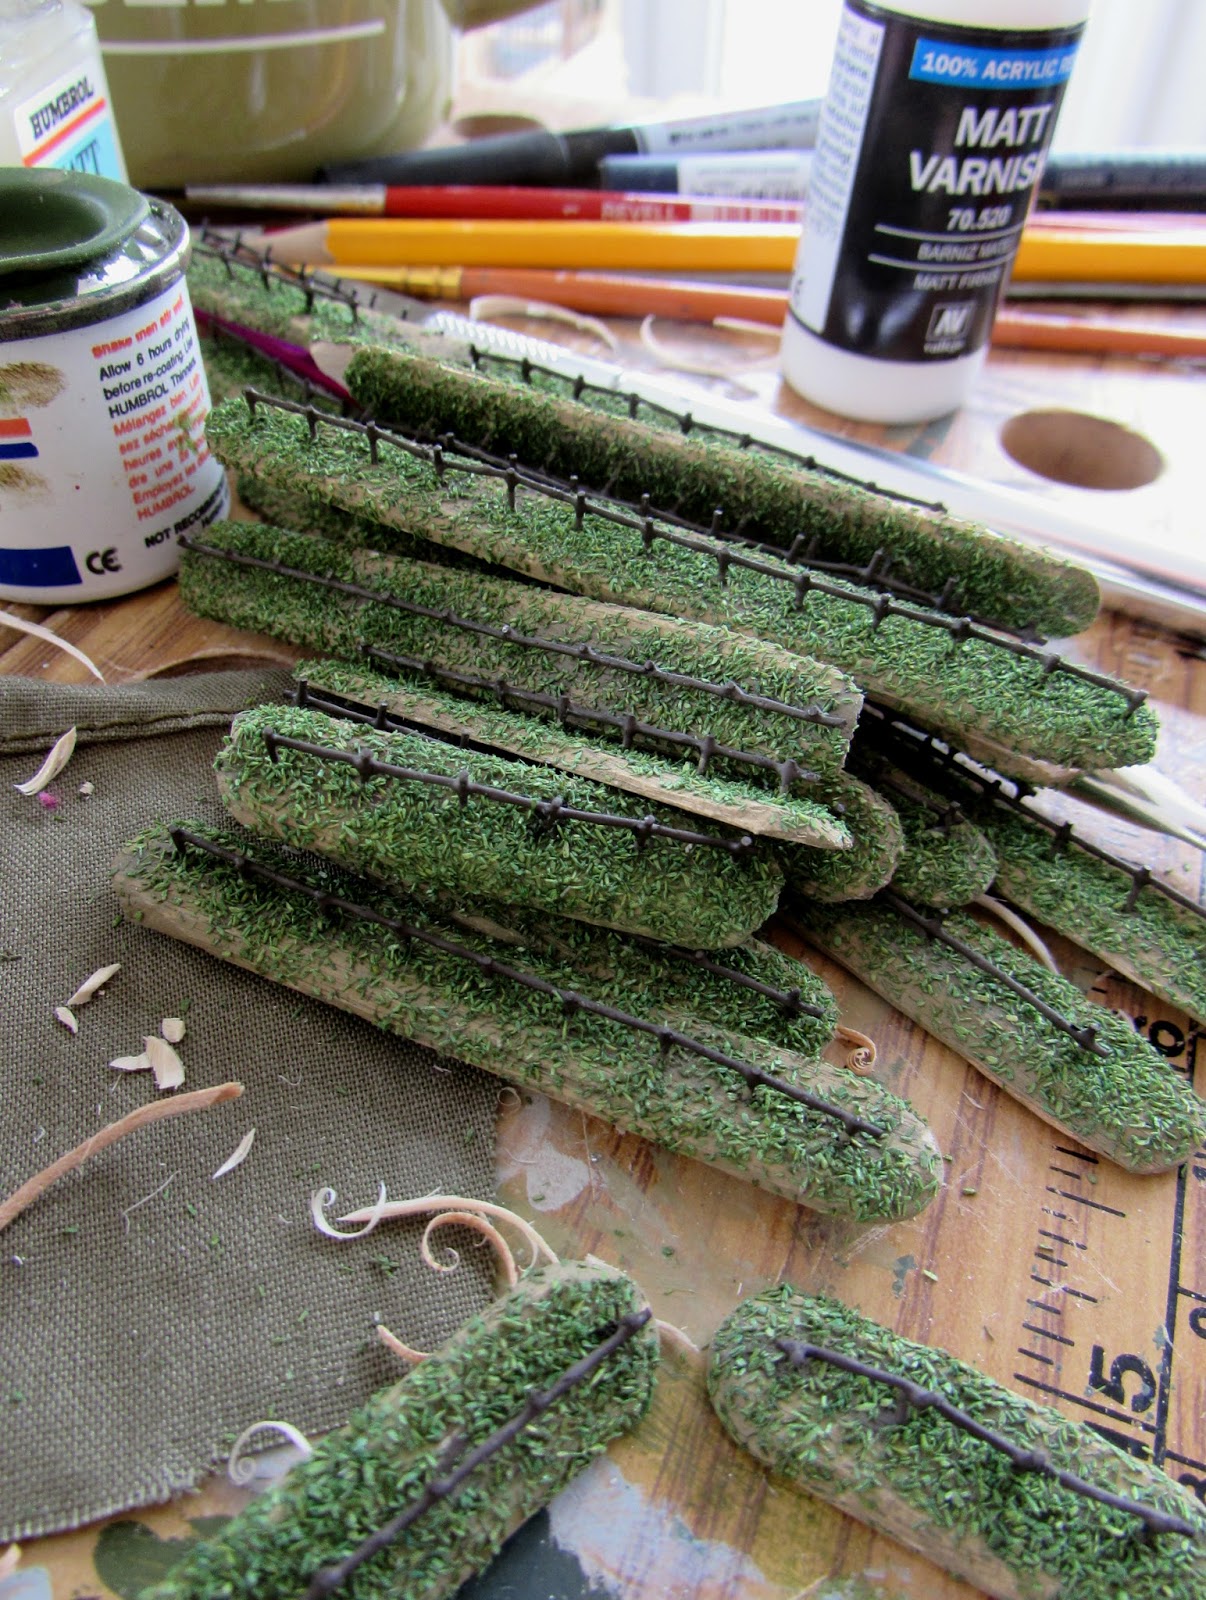
Continuing with terrain features on lolly sticks, today I made rustic fences, hedges and also some painted fences suitable for city boulevards and town squares.

If I never whittle another lolly stick it'll be too soon...

I chamfered and whittled off loads of lolly sticks, some of which had been cut to different lengths for variation this time and trimmed about 1.5m altogether from the aviary wire to see me out with the job in hand. The first lot of fences this time were going to be a more rustic style, bare wood or creosoted finish in Humbrol 98 with the usual Humbrol 29 dark earth and grass mix scatter.

Rustic post & rail fences

The thinnest possible strips were trimmed off green scourer pad for hedges. I used this instead of pipe cleaners as it seems you can only get the chenille variety these days and you can see the twisted wire all too easily compared to the fluffier cotton type that was around 30 years ago. The hedge bases had to be painted brown first as the green pad was open enough to see the ground. 

Hedge clipping

Various Humbrol greens and browns were sloshed on the glued down hedges (which had a good texture but were a horrible blue-green) and different scatters applied until there was a good variation of foliage.

The smartly painted city boulevard central reservations or town square railings differed only in that the grassy area was painted & flocked, then the edge where the stone kerb was going to be had to scraped clean with a scalpel. 

French blue town railings

I've also been experimenting with a fine tweed pattern polyester from charity shop clothes to use as texture for cobbled streets. So far I have sprayed it brown to take the contrast out of the herringbone design and when it is actually in use it will have all sorts of oil pastel shading across the surface. 

Various post & rail fences and hedge

The 'cobbled road' is still too uniform in spite of the amount of spray paint I put on it so I went over a bit of road gently with light yellow ochre and light red-brown oil pastels sideways on to prevent harsh lines and streaks.

With light yellow ochre and re-brown oil pastels

The texture of the cloth meant that I now got the impression of an even pattern of regularly laid cobblestones but without really seeing that it is actually out of scale and herringbone all over.

Tuesday, 1 March 2016

Post & Rail Fences

I'd been thinking about this since we knocked up an aviary in the garden.

Put simply, one strand from fine aviary mesh is trimmed to the length of a lolly stick (which had the edges chamfered off) and hammered gently into place. I used a small cabinetmaking hammer for this. The base is then painted or flocked as required.


I did this first batch in white for use on well-to-do farmsteads; the next batch will be in a more rustic plain wood finish. I am not going to need that many of them as I doubt they will even afford soft cover let alone incur a movement penalty and are just there for a bit of eye-candy.

Monday, 29 February 2016

Carving Hills

So after yesterday's success with colouring the gaming cloth it is time to start carving up foam for under-cloth hills.

Originally scrounged off a neighbour, the stuff has been hanging around for ages. My brother-in-law is having one sheet for his model railway.
Cut down the middle I now have several sections approximately 36mm thick which will be plenty thick enough for the majority of undulating agricultural land. I might save some of the original thickness bits for escarpments, for example, when recreating the town of Cassel.


I used a steak knife to cut the foam to size, going about a centimetre deep to start the cut off, then hacking all the way through. The shallow initial cut meant that the foam didn't split in the wrong direction and the thinness of the blade helped cutting round corners .A carving knife had a whippy enough blade to enable distorting it whilst sawing to scoop sections out or for shaving layers off.


I now have more than enough to cover two pasting tables placed side by side although a lot of the time the terrain will be fairly flat, completely flat (in places) or only slightly undulating. The river sections shown will probably only be used for special scenarios requiring a deeply cut valley (for example, crossing The Meuse or the attack on Fort Eben Emael)


The new gaming cloth on the table shown above. Just add trees, fields, houses, tracks and rivers. With all the hill sections used the landscape is probably rugged enough to recreate the Ardennes sector. May have to make/acquire some thinner contours.


Tuesday, 23 February 2016

"Looks Like A Tablecloth"

I have been hankering after new wargaming terrain system for months.

Frankly, I was bored fighting over the same old crossroads, river crossing and field network 30cm sq hardboard scenery tiles. Bless them, I only made them about 30 years ago during wargaming burst part one. They were a bit too flat with mesa-like hills looming up in the middle somewhere and were in desperate need of flocking or something as the original finish was whatever tin of green paint my dad had spare with black and other colours drybrushed in for shading.


I decided to go down the Mark Luther route as I call it as his is the best example of this terrain method on the internet and probably elsewhere.

Pommery Farm, Mark Luther


He uses 8' x 6' tables or thereabouts, places a large number of shaped polystyrene hill sections to form rolling undulations, often taping them into place. A variegated ground-coloured cloth is thrown over the top, eased into any small gullies and felt & carpet-like material is spray mounted into place for fields & rough patches. Roads & tracks are drawn on with chalk pastels and other pieces added like trees, buildings, hedges & telegraph poles.

So an old 'ivory' coloured bedsheet, trimmed to fit two pasting tables when bolted together, was dyed first with Dylon Pebble Brown hand dye then Olive Green (£4-6 in Wilkinsons or The Range) in the hope that it would...well I did not know what to expect, I think I hoped it would somehow mingle in some way.
That ended up a plain sage green so I then balled it up tight and bound it up with string in a few directions for a random tie-dyeing effect. I had to do this three times for the effect I was looking for, possibly because the dye wasn't up to temperature this time but came out a quite nice sage green with dark khaki brown mottled patches.

Going down the tie-dye route from the outset with Pebble Brown would have made an acceptable cloth for desert warfare.

Next to spray some random patches of green, brown and possibly some sort of dry grass kind of colour.

The only yellow I could find was Hycote filler primer (£6 from The Range; Halfords had some for £8) which is more like a ripe sunflower field than dry grass of the Pas de Calais region! Again, the only green was a rather rich bottle green Plasticote in a Super Satin finish (£4 I think, from The Range) and Rustoleum 'Painters Touch' in Nutmeg satin finish (Yorkshire Trading at £4 a can) for a dusty brown.

I hoped that the surface of the cloth was going to be adequately uneven and the spray coat thin enough for the satin finish etc to be invisible and this proved to be the case.

Even the slight breeze lifted the cloth outdoors so in spite of the budgerigar & guinea pig, I sprayed the cloth in the conservatory on some sheets of plasterboard, from a distance of about 40cm with very short bursts. I think I went over with each colour about four times altogether, building up the effect, being especially careful with the yellow.

One technique I discovered by accident was to spray from a low angle almost across the surface of the cloth. In this way, the spray caught on the slight creases in the material from when it had been washed after dyeing giving a sort of false 3D look.

Finished cloth in shade


It remains to be seen how it will wash up (if, indeed I am permitted to put it in the other half's machine). Before it had dried it was quite easy to rub the paint off if handled roughly. 

Finished cloth in sunlight, drying

When I find a decent dry grass colour I'll be spraying it a bit closer to what I really wanted.

Now for some forests...

Friday, 8 January 2016

Blog Trouble

Visitors might notice that they are unable to see many of the earlier pictures on the blog.

Picasa (which seems is irrevocably linked to Google, Google+ and Blogger) went haywire and I may have to re-upload all the images.

Meanwhile, here's a nice tank poster...
Sorry for any disappointment. I may be a while catching up, as and when I can be arsed...

Sunday, 26 July 2015

House Painting

When I picked up a dozen or so buildings off Mick at the Leven Miniatures stand at The Joy of Six the other day, I started saying to him that I hadn't finished the last lot but had to admit that in fact I'd hardly started the previous batch at all.

I do have enough to put together small farms and villages using my metal pre-Navwar Heroics & Ros buildings but the paint jobs are very scruffy now, having rattled around in Elastoplast boxes for over 30 years. Anyway, the Leven resin jobs were just too tempting, same goes for the thatched and leafy cottages I got off Ebay of undetermined provenance.


I made a start on some simple farm & mill buildings that looked solid enough to be made out of slate blocks with a slate tiled roof, I suppose much like constructions near Welsh quarries, although the texture on the warehouse walls is more like cobbles, there was enough on all surfaces to be able to dry-brush. I was going for a fairly plain utilitarian slightly rustic look, hence the ivy and so on. Paints are all Humbrol because all my older stuff is done in it (there wasn't a lot of choice in those days) and I didn't fancy changing.
  • 127 US Ghost Grey base coat on walls for mortar
  • 33 Black base coat on roofs
  • 83 Ochre base coat on Factory chimney for mortar (to be honest, I didn't have anything better)
  • 27 Sea Grey dry brushed on wall block work
  • 27 Sea Grey dry brushed on roof tiles
  • 62 Leather to pick out ridge tiles etc where present
  • 62 Leather dry brushed on chimney stack for bricks (too light compared to colour of mortar, see next)
  • 70 Brick Red dry brushed on chimney stack for bricks (that's better!)
  • 70 Brick Red dry brushed very lightly on roofs to tone down the greyness and maybe add a little iron-staining, also to dull down the ridge tiles where present 
  • 33 Black for open archways
  • 110 Natural Wood woodwork (plain wooden doors & shutters)
  • 98 Chocolate dry brushed onto woodwork
  • 34 White wood panelled hoist overhang and sign on factory (toned down with a bit of dry brushed 28 Camouflage Grey)
  • Pilot pigment ink pen to fill in window apertures
  • Matt varnish top coat
  • 98 Chocolate & Javis Scenics Light Meadow or Heath Green for ivy & other growth 


Easy paint job and functional on the table top.

Monday, 20 July 2015

The Joy of Six, 2015

Set in the Sheffield Hallam University atrium this time, the show this year was quite a bit bigger than 2014 with two very large Napoleonics games present.


Although it was mostly sunny all afternoon it wasn't too hot under the glass roof but this made photography awkward with the shadows of roof trusses on some of the gaming tables.

Luckily I had decided to travel light and only had a mobile phone for picture taking so quality wasn't going to be of paramount importance anyway!

After a quick look around I had a long chat with the gamers at the Gorodetschna 1812 table where they were having a lot of fun with a Saxon flanking manoeuvre around a somewhat swampy central battlefield where the Russian and Austrian main forces were faced off.

Gorodetschna 1812
Having watched a few moves I was dying to ask them about the figures and it turns out they are made from MDF, made by Commission Figurines who had a stand next door, are even cheaper than Heroics & Ros but still look really good on a large scale battle.

On then to the Polemos Napoleonics table where I had an interesting talk with Stewart, the Baccus technology guru regarding rules detail and how it can be pared down and still get a realistic outcome and had a demonstration of the rules app for android and an exciting tool it looked too! The free version is said to be a manual combat calculator whereby the player selects the combatants, ticks the modifier boxes and the app gives you the result. (Even on-screen dice which can be rolled by shaking the device!) The paid version will have (amongst other features) an army generator which will enable the player to select the firing unit and any shaken effects are automatically remembered and applied from previous combats.

Polemos Napoleonics
I got roped in to play on the Milton Keynes' DBMM Battle of Lake Trasimene game but quite enjoyed it once I started routing a some of the Roman cavalry.

DBMM, Lake Trasimene
The rules had been simplifed for participation game purposes, which was just as well as I hadn't had a decent sleep for 24 hours. In the historical battle, the Romans were drawn down the lakeside coast then attacked in the flank by warband hordes and pretty much annhiliated, which was happening on the table as well.

At 2pm I attended the seminar for the talk about Polemos rules design and more chat about the rules app.
The Baccus Panel
Nick, Peter, Chris, Stewart

Then to the Heroics & Ros and Leven Miniatures stands to collect my pre-orders.

That's Mick on the left

It's amazing to see how the Leven Miniatures range has expanded in the last few years and casting improved; it is certainly not the little hobby concern that I once thought it was. Must paint some buildings soon! Got some PerfectSix scenic detailing bits here as well. As for my purchases from H&R, I only needed some A13 mk1s & A9s to reorganize my cruiser squadrons a bit, plus a few other oddments as usual.

Some other eye-catching games:

Operation Bagration, 1944 by MAD Gamers

Hungry Legions by Mailed Fist.
Forest canopies sans bases perched atop tree trunks concealed troops underneath

Ligny, 1815 by The Lead Commanders
"Huge tracts of land!"

Nashville, 1864 by the Legion of Blokes.
Lovely painted-on roads and 'model railway quality' grass

Plassey, 1757 by Russ Fewtrell & Ian Taylor.
Tent City!

Waterloo, 1815 by Lee Sharpe & Ian Willey
Permanent terrain boards, I believe

Finally, I would like to thank the Wyre Forest Gamers and Per Broden, not only for putting on a good-looking game but also for storing my luggage under their table while I wandered about!

The usual amount of handout information from Wyre Forest Gamers!


It was a great show (I only had time for one coffee, a stimulant drink going untouched in my backpack and was too interested in things going on to notice the cafe closing so went hungry) and I can only apologize for not mentioning all of the games. With luck there will be more comprehensive show reports somewhere with more (and better quality!) photographs.

Action plan for 2016:
  • bring a decent camera
  • knock off work early & get some sleep
  • arrive for 'doors open' (4 hours not enough to 'do' all the games properly)

Tuesday, 14 July 2015

Simpler Morale

In an early version of the rules, a graphic chart was used to determine changes in morale levels. I thought it was quite nifty, not having to consult another table of figures or do any further calculations beyond the initial roll and it served more than one function: where your adjusted dice roll plotted on the chart told you any test-related actions the unit had to take and the adjustment to the unit's morale score.


Then I did away with the chart (one less quick reference sheet to find on the gaming table), rendered down the morale effects into just five brackets and knocked up a simple calculation (something that could fairly easily done in the head) for the apres-roll adjustment of the unit morale level, depending on how well or badly the dice went, so that there was a built-in possibility of rallying (or for morale to deteriorate) whenever a morale check was done and using the actual morale test roll to do this, which is the kind of thing I find elegant.

Although not into English Civil War gaming (yet!), I've been looking at the Polemos rules as they have some interesting game mechanics which I saw in an exhibition version at Joy of Six 2014. Combat & terrain effects all conspire to imparting levels of shakeness to a unit, resulting in degradation of coherence, effectiveness and eventual routing off the gaming table.

I decided to apply this somewhat to my rules so that now a failed morale check simply leads to dropping down by one morale bracket (which could be regained in subsequent turns by rallying if the unit was lucky enough to be allowed to do so). I still retain the morale dice roll and adjustments (a few daft or infrequently used ones have been thrown out) as a kind of saving throw mechanism and also the unit strength percentage on-table green tiddlywink (again, less notebook or post-it rummaging) but that is all there is now in terms of number crunching.

Results Tables

The colour coding is for the use of really small tiddlywinks until I sort out the scenic markers, which I think will 'disappear' into the terrain or at least obviate the need for fluorescent arrows with 'fall back' and the like written on and scattered all over the battlefield. Most of these miniature scenic details I will be acquiring from PerfectSix Scenics at Joy of Six via the Leven Miniatures stand this coming weekend.

While I was at it, I worked out how I am going to handle the morale of detachments of sections and the main body, after agonizing for months over how to recombine the independently arrived at scores with some sort of weighted or averaging calculation: I am just going to have the smaller detachment assume the morale level of the larger one (probably the main body) for simplicity's sake.

So that's that sorted, nothing left on my hitlist of anomalies to iron out. 

More to follow on the Joy of Six.

Wednesday, 17 June 2015

Scenic Awesomeness

Got the heads up about these scenic items from The Miniatures Page tonight. Not sure if anyone else makes this type of thing but they add a nice bit of detail to any wargaming scene.


They are made by  Perfect Six Scenics and will be on sale from the Leven Miniatures stand at the Joy of Six show.


The barrels, crates etc will also come in handy for me to use as base markers for pairing up artillery troops & their observers, for example, as described here.

Wednesday, 6 May 2015

Funny how...

...just when you thought it was safe to tip out the white spirit jam jar there are seem to be several more loose ends unravelling.


  • repaint a few spare German cavalry figures into Allied mounted couriers (they are going to need them with their comms debacle)
  • superglue rocks onto Carrier & Recce platoon leader figures
  • base up 25mm AT gun crews that somehow keep falling through the net
  • paint & flock 13.2mm AA integral crews & bases (Scotia Micromodels)
  • paint the drivers of approximately 25 Bren Carriers which have been taunting me for years
  • base up, paint & flock another French cycle infantry platoon
  • file Adrian helmet down into a beret on French infantry which were painted slightly wrong colour but usable as Chasseurs Ardennais infantry & repaint beret in a darker green
  • separate the French infantry that was painted the wrong colour many years ago; repaint, rebase & flock
  • a few strips of figures requiring boots, binoculars, etc to be painted
  • put tiny Belgian utility tractors on bases big enough for the 25mm AT gun to sit temporarily at the back when being towed
  • slosh a bit of Humbrol 26 on British infantry which were painted wrong shade many years ago
  • fix a sliver of tin/lead onto bases of Boys AT rifles and paint as ammo crate to distinguish them from Bren guns (same prone pose)
  • gather up spare British figures to make up engineer sections

This lot just completed. Next up: a few part painted aircraft and a couple of dozen resin buildings.